Rails 5 Shopify App With Redis Sidekiq Docker
Goals
- Create a new Rails 5 app
- Use the shopify_app gem for app architecture and API access
- Redis and Sidekiq for jobs
- Develop locally with the app contained in Docker
Prerequisites
-
Experience with Ruby and Rails
-
Updated versions of Ruby, Rails, and Docker.
-
Docker experience
-
ngrok account created and installed. Get started with ngrok
1. Create a new rails app using postgres as the database
rails new app_name -d postgresql
Be sure to change app_name to your apps name.
2. Set up docker in your new rails app
-
Add
.envto.gitignore -
Create
.env.templatewith the following:COMPOSE_PROJECT_NAME=app_name RAILS_ENV=development SECRET_TOKEN=asecuretokenwouldnormallygohere BIND_ON=0.0.0.0:5000 RAILS_MAX_THREADS=1 WEB_CONCURRENCY=1 DATABASE_URL=postgresql://app_name_development:yourpassword@postgres:5432/app_name_development?encoding=utf8&pool=5&timeout=5000 POSTGRES_DB='app_name_development' POSTGRES_USER='app_name_development' POSTGRES_PASSWORD='yourpassword' REDIS_DEV_URL=redis://redis:6379/0 SHOPIFY_API_KEY= SHOPIFY_API_SECRET_KEY= APP_BASE_URL= assets=precompileBe sure to change
app_nameto your apps name in POSTGRES_DB and POSTGRES_USER. -
Copy .env.template to .env
The values for
SHOPIFY_API_KEY,SHOPIFY_API_SECRET_KEY, andAPP_BASE_URLwill be updated later..env.template is committed to git as a starting point for others to develop locally. .env is ignored from git because it will have API keys and secrets that no one should have access to.
-
Create .dockerignore with the following:
.byebug_history .dockerignore .git log/* tmp/* -
Create Dockerfile with the following:
FROM ruby:2.5.1-alpine

RUN apk update && apk add build-base nodejs postgresql-dev

RUN mkdir /app
WORKDIR /app

COPY Gemfile Gemfile.lock ./
RUN bundle install --binstubs

COPY . .

LABEL maintainer="Derek Morash <derek.morash@gmail.com>"

CMD puma -C config/puma.rb
This sets up the container for the rails server. It first installs some packages we’ll need, copies Gemfile and Gemfile.lock (more on this later), runs bundle install, copies the app into the container, then starts the server.
Using the alpine version of images to reduce size. Alpine has all the features we should need.
-
Create docker-compose.yml with the following:
version: '3'

services:
  postgres:
    image: 'postgres:10.4-alpine'
    environment:
      POSTGRES_DB: 'shopify_base_app_development'
      POSTGRES_USER: 'shopify_base_app_development'
      POSTGRES_PASSWORD: 'yourpassword'
    volumes:
      - 'postgres:/var/lib/postgresql/data'
    env_file:
      - '.env'

  redis:
    image: 'redis:4.0-alpine'
    command: redis-server
    volumes:
      - 'redis:/data'
    env_file:
      - '.env'

  web:
    depends_on:
      - 'postgres'
      - 'redis'
    build: .
    ports:
      - '3000:3000'
    env_file:
      - '.env'
    volumes:
      - '.:/app'

  sidekiq:
    depends_on:
      - 'postgres'
      - 'redis'
    build: .
    command: sidekiq -C config/sidekiq.yml.erb
    volumes:
      - '.:/app'
    env_file:
      - '.env'

volumes:
  redis: {}
  postgres: {}
Docker compose is used to run our containers and setup any others we may need like postgres, redis, and sidekiq. Each services has some configuration options set to allow the containers to talk to each other. Be sure to change
app_nameto your apps name.
3. Setup ngrok
Are you using a custom subdomain?
-
YES?
Log into your ngrok dashboard and go to https://dashboard.ngrok.com/reserved.
If you already have a subdomain reserved find it in the list and copy just the subdomain, leave off the
.ngrok.io.If you haven’t already reserved a subdomain then create a new one on that same page.
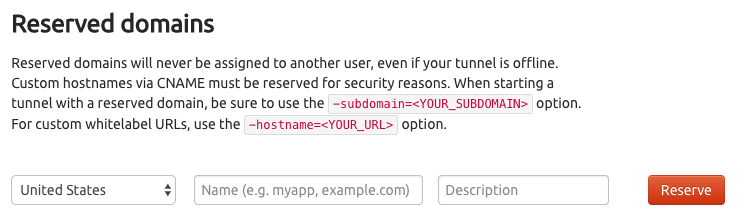
In your terminal run:
ngrok http -subdomain=my-app 3000 -
NO?
In your terminal run:
ngrok http 3000Note that if you’re not using a reserved subdomain you will have to update the url for your app in the partners dashboard every time you restart ngrok.
Now that ngrok is listening on port 3000 it will list some info. Look for the forwarding address that uses https and copy it for use in the next step.
4. Create a new app in the Shopify partners dashboard
Log into your Shopify Partners dashboard to create a new app. Click here to become a shopify partner if you aren’t already signed up.
Find the apps link in the dashboard on the left then click create app. You’ll get a popup like this.
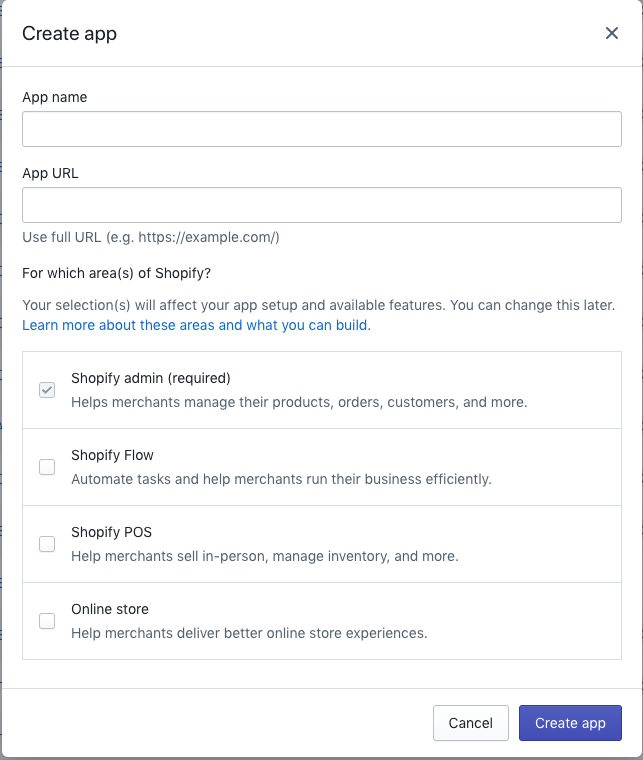
Create app prompt for shopify dashboard
Here you will give the app a name, and the URL for your new local app. The URL is the forwarding address that was created in the previous step by ngrok.
Note that if you’re not using a reserved subdomain you will have to update the url for your app in the partners dashboard every time you restart ngrok.
5. App configuration for local development
-
Open
.envand update the followingCOMPOSE_PROJECT_NAMEname of your appSHOPIFY_API_KEYprovided by shopify after creating a new appSHOPIFY_API_SECRET_KEYprovided by shopify after creating a new appAPP_BASE_URLthe ngrok forwarding URL
-
Open
config/database.ymlUnder the
developmentsection add the following lines:database: <%= ENV['POSTGRES_DB'] %> username: <%= ENV['POSTGRES_USER'] %> password: <%= ENV['POSTGRES_PASSWORD'] %> -
Create
config/initializers/sidekiq.rbwith the following:if Rails.env.development? Sidekiq.configure_client do |config| config.redis = { url: ENV['REDIS_DEV_URL'], size: ENV['SIDEKIQ_CONNECTIONS'] } end Sidekiq.configure_server do |config| config.redis = { url: ENV['REDIS_DEV_URL'] } Rails.application.config.after_initialize do Rails.logger.info("DB Connection Pool size for Sidekiq Server before disconnect is: #{ActiveRecord::Base.connection.pool.instance_variable_get('@size')}") ActiveRecord::Base.connection_pool.disconnect! ActiveSupport.on_load(:active_record) do ActiveRecord::Base.establish_connection Rails.logger.info("DB Connection Pool size for Sidekiq Server is now: #{ActiveRecord::Base.connection.pool.instance_variable_get('@size')}") end end end end if Rails.env.production? Sidekiq.configure_client do |config| config.redis = { url: ENV['REDIS_URL'], size: ENV['SIDEKIQ_CONNECTIONS'] } end Sidekiq.configure_server do |config| config.redis = { url: ENV['REDIS_URL'] } Rails.application.config.after_initialize do Rails.logger.info("DB Connection Pool size for Sidekiq Server before disconnect is: #{ActiveRecord::Base.connection.pool.instance_variable_get('@size')}") ActiveRecord::Base.connection_pool.disconnect! ActiveSupport.on_load(:active_record) do ActiveRecord::Base.establish_connection Rails.logger.info("DB Connection Pool size for Sidekiq Server is now: #{ActiveRecord::Base.connection.pool.instance_variable_get('@size')}") end end end end -
Open
Gemfile- Make sure ruby version is 2.5.1
- add
gem 'shopify_app'above the rails gem - add
gem 'sidekiq' - add
gem 'redis', '~> 4.0' - change
gem 'tzinfo-data', platforms: [:mingw, :mswin, :x64_mingw, :jruby]to just begem 'tzinfo-data'. Our docker container needs to use this gem but by default it is locked down to certain platforms.
-
Rename
Gemfile.locktoGemfile.lock.old, then create an emptyGemfile.lockBundle install will fail inside the docker container if this file was created when creating the rails app on our local machine. We want to let docker create it’s own lock file from our updated Gemfile.
6. Build and spin up the docker containers
Now that everything is configured we can build our containers and get them up and running to start working on our app.
- run
docker-compose buildto download the images and build the containers. This may take a few minutes. - in a new terminal start ngrok if it’s not already running.
ngrok http 3000orngrok http -subdomain=my-app 3000 - run
docker-compose upto get the containers running with the settings from docker-compose.yml - in a new terminal run
docker-compose psto view the status of containers in this project - run
docker-compose stopto stop the containers
With ngrok running and all containers up you should be able to open the ngrok forwarding URL in a browser and see the “Yay! You’re on Rails!" screen.
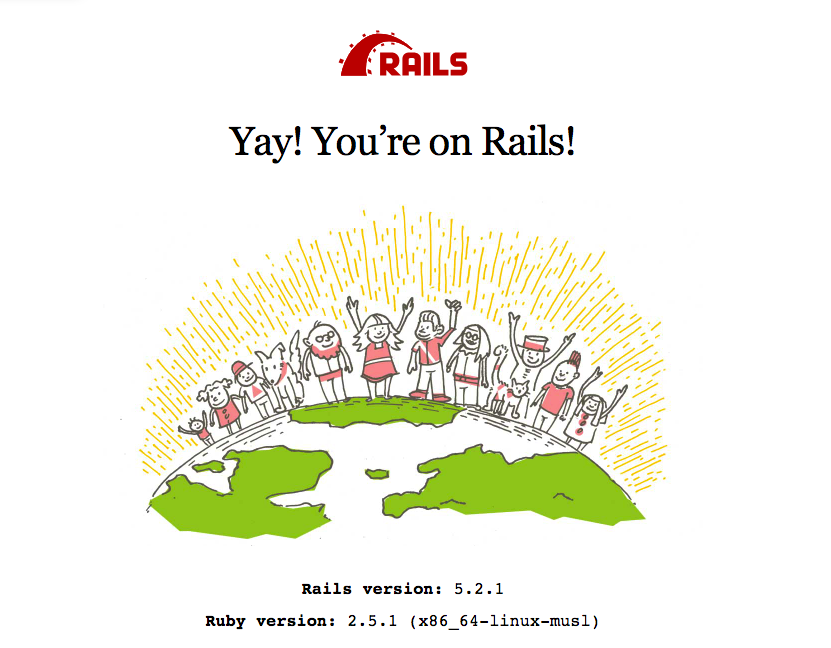
You're on Rails!
7. Shopify app gem setup
There are just a few things left to do to turn our Rails app into a Shopify app. With docker running, start by opening a new terminal.
-
Generate shopify app. Since we’re using environment variables for the app api key and secret we don’t want to use the optional arguments for that command.
docker-compose exec web rails generate shopify_app:install -
Create the shop table, model, and controller
docker-compose exec web rails generate shopify_app:shop_model -
Run the migrations to create the shop table in the database
docker-compose exec web rails db:migrate -
Generate resources to create a basic page that installed users will see. This page is just an example use of the Shopify API to print out a few products from the store and list the webhooks set up for this app.
docker-compose exec web rails generate shopify_app:home_controller -
Open
config/initializers/shopify_app.rband change the following lines:config.api_key = ENV['SHOPIFY_API_KEY'] config.secret = ENV['SHOPIFY_API_SECRET_KEY']
8. Get to work
With ngrok running and all containers up you should be able to open the ngrok forwarding URL in a browser and see the shopify app install screen.
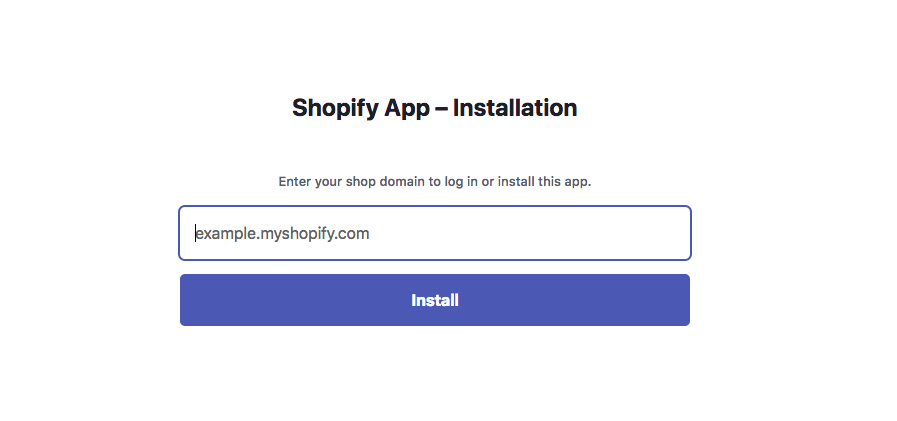
App install screen
Helpful commands
-
Tail rails logs
docker-compose exec web tail -f log/development.log -
Rails commands
docker-compose exec web rails db:migratedocker-compose exec web rails console -
Access postgres from the command line
docker-compose exec postgres psql -U app_name_development